Hello
again! I'll warn you from the beginning; this will be a super long
post!! I'm going to try my best to explain, step by step, my creating
the mixed media canvases I shared in my last post.
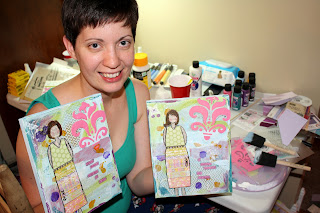 |
| C'est moi. Forgive the bags under my eyes, this was very late/very early! |
The
great thing I've already learned about mixed media is that you can use
so many things that are considered scrap or trash. Paper, ribbons,
rub-on's...the left over bits and bobs make the best materials for these
projects.
Here's a list of the supplies that I gathered to get started:
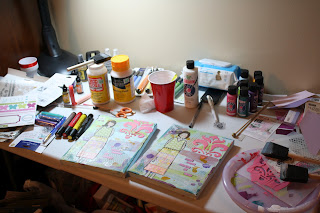 |
| My mess of a craft table. Somehow, it works. |
Mod Podge (or something of the like). You'll be gooping this stuff on, so
you might as well get the big bottle! I've seen 'recipes' to make this
at home, so check back for a post on that excursion later!
Acrylic
Paints. The cheap kind works great. I got mine for around 70 cents a
bottle, so go all Roy G Biv in the paint aisle and stock up.
Paper.
Again, scraps work great. Unless you're looking for a specific pattern
or have something already in mind, pick through your scraps for this.
Canvas.
Any size, and shape, and again, get the cheap ones. I'm sure the
expensive ones are 'nicer', but you're seriously covering it in paint
and glue up to your eyeballs. Go cheap and just buy more :)
Paintbrushes.
I picked up a multi-pack of the foam brushes for this go-round, but
I'll be getting some bristle brushes for the next time. The foam soaks
up whatever you're working with too much for my tastes.
Modeling
Paste. This can get pretty pricey at the craft store. The jars I've
seen are around $20 each; I lucked out and found a bottle of it on
clearance. This is a good product to whip out your 40% off coupon for.
It's worth the splurge! You'll also need something to spread the paste
on with, but don't buy anything special. I used an old, plastic library
card. What better re-purpose for those fake credit cards that come in
the mail!?!
Stencils.
This is another item that comes in a variety of price points. There are
some designed specifically for crafting (The Crafter's Workshop), which
I did use on this project, but I also used a stencil that I picked up
at my local super center on clearance for 25 cents!
Pen.
I've yet to see the pen that Christy (haha...we're on a first name
basis now somehow!) recommends and sells in her store out-and-about
anywhere, so I tried my luck with a normal ball point pen. Worked
great!! She does talk about how her recommended pen will still write
when your canvas isn't 100% dry, but I didn't come across a problem
using mine.
Markers.
OK. I'm going to admit this now and get it out of the way. After
watching Christy's video a zillion-ish times, I bought every color of
the Faber-Castell Artist Big Brush Pens that I could get my hands on.
Granted, they were on sale at 40% off and free shipping, but they still
made a dent in the {non-existent} crafting budget. Minimum, I'd suggest
getting black (to outline), brown, yellow and red (for hair colors).
These are amazing pens that use India Ink, which allows them to blend
fabulously. Love, love, love. I also pulled out a few Faber-Castell gelatos to use for the cheeks :)
Rub-on's.
Any and all will do. These are a great way to add visual texture with
intricate designs with no effort at all. You can use scraps of rub-on's,
designs you're not interested in putting on layouts or cards, really
anything.
Sprays/Inks. Any kind. It's just to add visual interest.
So
the list seems long, but it's really only a few items for such an amazing
piece! Of course, you can add fibers, ribbons, and anything else your
little heart desires.
The
first step is to adhere your paper to the canvas with Mod Podge. Feel
free to tear different sizes, shapes and patterns. You don't have to
cover every inch of your canvas, but use enough to establish a good
background. The trick to Mod Podge is to put a layer under AND over
what you're adhering down. Under makes it stick, over makes it stay. It
dries fairly quickly, but make sure it's dry before moving on. A blow
drier works wonders.
Step
two: paint it up. I knew I wanted my background to have an overall
blue-ish tone to it, even though I used greens, reds and whites in my
paper. Take some acrylic paints, and give your canvas an all-over light
coat. Don't worry about streaks, that adds to the texture. Some areas
can be darker, some lighter. Have fun with this part! I gave the sides
of my canvas a light coat (using my fingers) of the blue while I was at
it.
Feel free to grab some other colors and get those on there, too. Get your fingers messy and get creative!
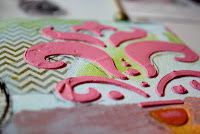 |
| Stenciled modeling paste |
Three:
stencils and paste. Use them with your paints for visual interest, and
use them with modeling paste for depth! Modeling paste comes white, but
just use any color of your paints (or splurge on some ink to drop in for
a more vivid color) mixed into it. Grab your library card (ha!), scoop
some up , place your stencil, and gloop it on! The thicker you apply the
paste, the more depth you'll end up with. It's always an amazing
feeling to spread that stuff on, pull back your stencil, and see such an
amazing, easy effect!!!
I
applied the modeling paste once I was satisfied with how the canvas was
looking, because I knew this would take the longest to dry. I used the
hair drier on it for a few minutes, but then ended up just working
around it for the rest of the piece to let it completely dry.
Fourth (but could be at any point): Sprays and inks. Add as little or as much as you'd like.
Next:
the girl! The design of this girl is 100% Christy. I'm not even going
to pretend that I had any creative insight in this portion!! This part
is my favorite because it's when you see this crazy conglomeration of
colors, patterns and textures all come together to make an amazing piece
of art.
Head/neck,
arms, legs: These are cut out of an old book. Mine happens to be a
dictionary that I've been tearing out of for years. Don't worry about
getting anything shaped perfectly, you'll be tracing around it with your
markers later.
Shirt
and Skirt: cut each out of paper of differing patterns for contrast. I
think this is one area that I'll need a little more practice in, because
I didn't end up giving either of my ladies a very flattering figure!
She gets Mod Podge'd down (remember, under and over!) and left to dry.
 Lastly,
finishing touches! This is where I pulled out my pen to doodle in
random areas around the canvas, applied rub-on's in various spots, and
got to try out my new markers!
Lastly,
finishing touches! This is where I pulled out my pen to doodle in
random areas around the canvas, applied rub-on's in various spots, and
got to try out my new markers!
I used the black to outline completely around the girl, then went in with brown, black and red for her hair.
I
cut apart a sticker with a phrase on it, added those on (they stuck
very well without any other adhesive than their own), and marked around
them with my pen, and was finished!!
I
don't know that I've ever been as excited about the results of a
project - ever. I didn't expect the process to go as smoothly as it did
or to turn out as well as it did. I woke up several times through the
night (and even got out of bed to look at them again) to try and add
fibers to it...lace on the skirt, ribbon around the bottom...but finally
convinced myself that there would be more canvases and more projects
that I could add plenty of different things to.