10.31.2012

Let it Glow, Let it Glow, Let it Glow!

It's hard for me not to continually think of Christmas right now. If I wasn't enough for myself, I've drug my mother in it, too! We try to get together at the beginning of the Holiday season every year to get a jump start on the Christmas cookie baking. This year, the timing just worked out for it to be this weekend!! The dough has been made, the cookie cutters are on stand-by, and the Christmas music is all queued up. I'm ready!
I was sorting through my baking cupboard when I stumbled across some wonderful smelling sticks of cinnamon. I rarely (ok, never...) use anything but ground cinnamon, so I was thinking of some way to put these sticks to good use.
I found an old jar candle, grabbed some Glue Lines® and ribbon, and whipped this pretty little thing up in no time!

I put two strips of Glue Lines® around the jar to make sure that the cinnamon sticks had something to hold on to, lined the jar with the sticks, then put a decorative ribbon around the outside.

It looks so pretty lit up, and it is making my house smell amazing!!!


I wrote this blog post while participating on the Glue Dots design team

10.30.2012

Easing into Christmas with Glue Dots!

Ok, ok, I'll admit it.

I've been listening to the Elf soundtrack every day for over a month on my commute to work (and I have an hour and a half commute).

I love Christmas. I'd start decorating right about now if a) my husband would let me, and b) it wouldn't make the kids ask if Santa was coming every single day. There's just such joy, anticipation, excitement and happiness around during the Holiday season that makes me want to start it as soon as possible.

Since it's technically not even Halloween yet, even though the kids went Trick-or-Treating a few days ago, there is no way it would be acceptable for me to dig out any Christmas decorations yet. I'm trying to fill that void, so it's on to making some Christmas cards! I can easily justify starting these early by calling it 'forethought' or 'good planning', even though I know better!
I love making my Christmas cards every year, and I always try to come up with some way to make the cards creative, yet super easy to make en masse. I'm kind of excited for this year's creations! They have the look of a traditional Christmas card, but the twist is that they're made out of felt!

I cut out the card base and ornament, then stitched on both of them. Glue Dots® did a great job of adhering everything together! If you've ever tried to use liquid glue on felt, there's a lot of 'show through', and you'd see the glue on the reverse. Not with Glue Dots®!
All of my words were typed out on my typewriter and adhered with Glue Lines®.


There you go! An easy way to get into the Christmas spirit, even if it's a bit early! If I forget to tell you between now and December 25th,


I wrote this blog post while participating on the Glue Dots design team

10.16.2012

T-Shirt Scarf...and New Year's Resolutions!

Well, hello, my much neglected blog!! I've missed you! If your family is anything like mine, this time of year tends to play out in fast forward, minutes feeling like seconds and a week feeling like a day. If you use this 'holiday mathematics', that means it's only been a few days since my last blog post! Ahhh, OK. Feeling much better about my absence now!


Several people have ask me about the scarf I'm donning in my profile picture (over there --->), so I'm finally getting around to doing a post about it!
It was a super easy project that I found on Pinterest. There are several styles and tutorials showing how to do this, which is good, because I forgot to take pictures after a certain point!


Step One: Lay out an old T-Shirt. This is one I've had incredibly too long, as evidenced by the holes in the shoulders. I made snips along the side of the shirt every inch or so as guides.
Step Two: Cut strips from one side of the shirt to the other (a rotary cutter would work wonders at this point. Too bad all I could find were my kitchen scissors!!)

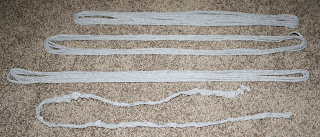
 Step Three: You'll end up with strips in varying lengths due to the cut of the T-Shirt. Stretch each loop as far as it will go and sort them by their size.
 Step Three - B: Some of the loops broke, surely where the preexisting holes were. I used those pieces to braid a long strip.
Step Four: Gather all of the loops onto your hand. The loops will be long. We'll shorten them by folding the loops up, doubling what is in your hand. Loop the braided length with the scarf, using the end of it to tie all of the loops together at the back.


Maybe it's time to start some New Year's resolutions early...like blogging more often! Here's hoping!