8.08.2012

Hi Girly Face!

I finally got a chance to read through my latest issue of Paper Crafts Magazine, and I felt the creative urge to get back to craft land a make something whimsical and fun. I had a basic idea in my head, and here's what I came up with!
Girly Face 'Hi"

This little Girly Face was sketched onto a dictionary page and cut out. I used Faber Castell gelatos for the cheeks, and I used Faber Castell Artist Big Brush Pens to color the scrap doily hair. Buttons for eyes, scrap papers from My Mind's Eye (Stella Rose) for the backgrounds, paper tape from Recollections for decoration and Thickers letters complete the card. I adhered everything with Mini Glue Dots.

I think she's a lot of fun!! Can't wait to have more time to make her some little friends and get a card pack together!

7.31.2012

Quick and Easy Birthday Decor!

Subway Art
After I finished my wall decor last week, it turned out that I had a few extra frames that didn't make the cut. I wanted to utilize them somehow, so I thought I'd made some super easy birthday wall hangings.
I'm seeing Subway Art around like crazy, so I took some inspiration from that for this first project:


This was so easy!! I took a few pieces of bakers twine (The Twinery), some chipboard letters (K&Company) and glued them together using Mini Glue Dots®. Simple and completely customizable!


For my next frame, I knew that I wanted to use some of the super cute paper from the DCVW stack Celebration. I trimmed the paper to fit and added my 'Happy Birthday' phrase using Micro Glue Dots®. Love it!!!

As a frame on my decor wall
Don't over think your next party. These are easy and quick ways to decorate for your celebration -- without breaking the bank!!

I wrote this blog post while participating on the Glue Dots® Design Team

7.21.2012

Another Pinterest Project!

Hello, hello, hello!

I figured that I was on a roll taking on new projects this last week (did you see my mixed media canvas??), so I decided to try and continue the trend! I've been eying a Pinterest idea for months now, and finally got around to trying it out.
I went to a second hand store and lucked out -- all of their pictures and frames were 50% off!! Add those to a few from my mother in law and a few (including the huge one!) my hubby found at a flea market, and you get this eclectic bunch:
I was looking for frames of all sizes, textures, and shapes, rather than focusing on color. I took the backing off the ones that had pictures in them and gave them all a good coat of flat black spray paint.


Next is the fun part!! Have some frame fun before they go on the wall!


Now to the hanging...
Wall - Before. Blah!!

Wall - After!
With the light off

This was so fun and easy to do!!! Walking past it just makes me smile.

Shouldn't every part of your house do that??

7.19.2012

Breaking it Down, Mixed Media Style!


Hello again! I'll warn you from the beginning; this will be a super long post!! I'm going to try my best to explain, step by step, my creating the mixed media canvases I shared in my last post. 
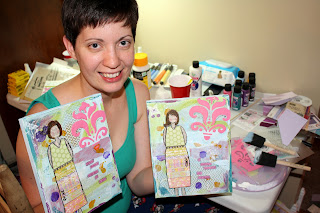
C'est moi. Forgive the bags under my eyes, this was very late/very early!

The great thing I've already learned about mixed media is that you can use so many things that are considered scrap or trash. Paper, ribbons, rub-on's...the left over bits and bobs make the best materials for these projects.  
 
Here's a list of the supplies that I gathered to get started: 
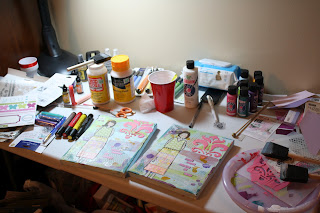
My mess of a craft table. Somehow, it works.

Mod Podge (or something of the like). You'll be gooping this stuff on, so you might as well get the big bottle! I've seen 'recipes' to make this at home, so check back for a post on that excursion later! 
Acrylic Paints. The cheap kind works great. I got mine for around 70 cents a bottle, so go all Roy G Biv in the paint aisle and stock up. 
Paper. Again, scraps work great. Unless you're looking for a specific pattern or have something already in mind, pick through your scraps for this. 
Canvas. Any size, and shape, and again, get the cheap ones. I'm sure the expensive ones are 'nicer', but you're seriously covering it in paint and glue up to your eyeballs. Go cheap and just buy more :) 
Paintbrushes. I picked up a multi-pack of the foam brushes for this go-round, but I'll be getting some bristle brushes for the next time. The foam soaks up whatever you're working with too much for my tastes. 
Modeling Paste. This can get pretty pricey at the craft store. The jars I've seen are around $20 each; I lucked out and found a bottle of it on clearance. This is a good product to whip out your 40% off coupon for. It's worth the splurge! You'll also need something to spread the paste on with, but don't buy anything special. I used an old, plastic library card. What better re-purpose for those fake credit cards that come in the mail!?! 
Stencils. This is another item that comes in a variety of price points. There are some designed specifically for crafting (The Crafter's Workshop), which I did use on this project, but I also used a stencil that I picked up at my local super center on clearance for 25 cents! 
Pen. I've yet to see the pen that Christy (haha...we're on a first name basis now somehow!) recommends and sells in her store out-and-about anywhere, so I tried my luck with a normal ball point pen. Worked great!! She does talk about how her recommended pen will still write when your canvas isn't 100% dry, but I didn't come across a problem using mine. 
Markers. OK. I'm going to admit this now and get it out of the way. After watching Christy's video a zillion-ish times, I bought every color of the Faber-Castell Artist Big Brush Pens that I could get my hands on. Granted, they were on sale at 40% off and free shipping, but they still made a dent in the {non-existent} crafting budget. Minimum, I'd suggest getting black (to outline), brown, yellow and red (for hair colors). These are amazing pens that use India Ink, which allows them to blend fabulously. Love, love, love. I also pulled out a few Faber-Castell gelatos to use for the cheeks :)
Rub-on's. Any and all will do. These are a great way to add visual texture with intricate designs with no effort at all. You can use scraps of rub-on's, designs you're not interested in putting on layouts or cards, really anything.  
Sprays/Inks. Any kind. It's just to add visual interest. 

So the list seems long, but it's really only a few items for such an amazing piece! Of course, you can add fibers, ribbons, and anything else your little heart desires.  
 

Let 's get started! 
 
The first step is to adhere your paper to the canvas with Mod Podge. Feel free to tear different sizes, shapes and patterns. You don't have to cover every inch of your canvas, but use enough to establish a good background. The trick to Mod Podge is to put a layer under AND over what you're adhering down. Under makes it stick, over makes it stay. It dries fairly quickly, but make sure it's dry before moving on. A blow drier works wonders. 
 
Step two: paint it up. I knew I wanted my background to have an overall blue-ish tone to it, even though I used greens, reds and whites in my paper. Take some acrylic paints, and give your canvas an all-over light coat. Don't worry about streaks, that adds to the texture. Some areas can be darker, some lighter. Have fun with this part! I gave the sides of my canvas a light coat (using my fingers) of the blue while I was at it. 
Feel free to grab some other colors and get those on there, too. Get your fingers messy and get creative! 
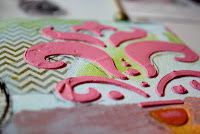
Stenciled modeling paste
Three: stencils and paste. Use them with your paints for visual interest, and use them with modeling paste for depth! Modeling paste comes white, but just use any color of your paints (or splurge on some ink to drop in for a more vivid color) mixed into it. Grab your library card (ha!), scoop some up , place your stencil, and gloop it on! The thicker you apply the paste, the more depth you'll end up with. It's always an amazing feeling to spread that stuff on, pull back your stencil, and see such an amazing, easy effect!!! 

I applied the modeling paste once I was satisfied with how the canvas was looking, because I knew this would take the longest to dry. I used the hair drier on it for a few minutes, but then ended up just working around it for the rest of the piece to let it completely dry. 
 
Fourth (but could be at any point): Sprays and inks. Add as little or as much as you'd like.  
 
Next: the girl! The design of this girl is 100% Christy. I'm not even going to pretend that I had any creative insight in this portion!! This part is my favorite because it's when you see this crazy conglomeration of colors, patterns and textures all come together to make an amazing piece of art. 
Head/neck, arms, legs: These are cut out of an old book. Mine happens to be a dictionary that I've been tearing out of for years. Don't worry about getting anything shaped perfectly, you'll be tracing around it with your markers later. 
Shirt and Skirt: cut each out of paper of differing patterns for contrast. I think this is one area that I'll need a little more practice in, because I didn't end up giving either of my ladies a very flattering figure! 
She gets Mod Podge'd down (remember, under and over!) and left to dry. 

 
Lastly, finishing touches! This is where I pulled out my pen to doodle in random areas around the canvas, applied rub-on's in various spots, and got to try out my new markers! 
I used the black to outline completely around the girl, then went in with brown, black and red for her hair. 
I cut apart a sticker with a phrase on it, added those on (they stuck very well without any other adhesive than their own), and marked around them with my pen, and was finished!! 


I don't know that I've ever been as excited about the results of a project - ever. I didn't expect the process to go as smoothly as it did or to turn out as well as it did. I woke up several times through the night (and even got out of bed to look at them again) to try and add fibers to it...lace on the skirt, ribbon around the bottom...but finally convinced myself that there would be more canvases and more projects that I could add plenty of different things to. 

And there will be :) 

7.17.2012

Spreading some birthday love -- mixed media style!

Hey, guys!
Was it me that said I'd have more free time to craft, photograph, and blog in my last post (two weeks ago!)?? Surely not. :)
I'm living vicariously through a lot of different friends right now...some on family vacations, some at the Stampin' Up! National Convention and some at CHA! Let me just say I'm jealous of each and every one of you!!
Things have been busy, but I've gotten some new inspiration and a new found crafty love to share with you!
First things first, I have to give all of my new-found-crafty-mojo love to the ever so talented Christy Tomlinson. You may have heard of her...like the lady who build the most awesome kids playhouse on some little new craft show on TLC!! The title of 'winner' was robbed from her, despite her amazing creation. I loved how you could see her artsy, crafty touches all around (inside and out, may I add) her work.
After the show, I looked up her blog and
FELL.
IN.
LOVE.

Her art is amazingly inspiring, and her YouTube videos are the best! You can find her blog here and here's a link to her YouTube channel. (this is the specific video I watched roughly 17 times to learn heads from tails in mixed media land!)

Here's my try at some Christy-inspired goodness!!

Mom picked this one...


...and this ended up being Kasey's.

I made one for my mom's birthday and one for my best crafty friend's birthday. The hardest part was deciding who got which!! (Mom ended up picking because she saw them first.)

Here are a few close up shots with some detail:

Modeling Paste

Pen doodling

I've really never loved anything I've created as much as these two pieces, and I know they'll live in great homes from now on.
I'll check back in my next post with all of my materials, beginning your own mixed media art, and a few techniques I learned along the way!

6.30.2012

Late Night Craft-A-Thon!

I don't know about you, but inspiration usually strikes me at the most inopportune times.

My crafting mojo always shows up while I'm at work, during my 90 minute commute to or from work, or now: 12:30 in the morning after I've already completed the to-and-from work drive, with a 9 hour work shift in between.

So, I figure while I'm obviously still awake, I'll go ahead and share what my little mind came up with in the wee hours of this weekend...it's perfect for 4th of July celebrations coming up!

Forgive the iffy picture, I had to take it myself!
       ...go figure. everyone else in my household is sleeping! It's now 1am!!

Glue Lines®, XL Glue Dots®,
Headband and Flag
I found headbands with a little base already attached to it on clearance at the craft store over the weekend. I knew they would make the perfect base for a little flower-esque do-dad, made with Glue Dots®, of course!

These little flags were originally for my kids to play with, but I decided to confiscate one for this project. I twisted the flag into a little snail-like circle and adhered it to one side of an XL Glue Dot®. That whole piece then gets stuck down to the pre-mounted base. I used Glue Lines® to attach coordinating red ribbon from my stash onto the headband.

I had originally made this with my daughter in mind, but I'm kind of loving this for myself!
Good thing there are plenty of Glue Dots® to go around!!


Supplies:
Continuous Glue Lines®, XL Glue Dots®
4x6 American Flag
I Top Twist Headband - Imaginisce
Finishing Fibers - Darcie
I wrote this blog post while participating on the Glue Dots® Design Team

6.19.2012

bringing the mojo back

I'm going to be pretty candid here.

Packing up my life, leaving the house and a job I loved, and leaving my immediate family wasn't as easy as I thought it'd be.

{shock, right?}

The avenue that released the most stress pre-move was right here in craft land. The Lair was my 'home away from home' (even though it was in my basement), my little escape from the world. Oddly enough, through this transition, creating is the one thing that hasn't come back to me as easily.
At all.
Monthly projects due turned into mandatory assignments {gasp!! homework!!}, and what used to be done in pleasure is now done as work.

I think my body realized that I needed a bit of an escape for a few weeks more than mind did, but I'm glad I took it. That's why teachers get Summer breaks...why lifeguards get rest periods...why Sunday School teachers get Monday through Saturday: refuel, recharge, and go back at it with a renewed passion.


This week's challenge
So I'm back at it! I found a great little challenge blog called The Play Date Cafe. It's fun. They give you a color scheme, you make the project! Guidelines without strict parameters = LOVE! I'm tipping my toes back into the rivers of crafting, and it feels ggggggood.

This card expresses exactly what I've been feeling in the last few months. Sometimes it's too much to ask of someone to go above and beyond.
Sometimes you have to just be.

And that's ok.


Materials used in this post:
Hollo's Cardstock
Sweet Baby Pickles - Soft Blue 12x12
Wright's Seam Binding
Hambly Screen Prints
Basic Grey - Green at hear- micro mono stickers
Basic Grey - Wisteria - alphabet stickers
Tim Holtz Tissue Tape - symphony
Ribbon - Target
Floss
Glue Dots - ultra thin and mini