Showing posts with label Christy Tomlinson inspired art. Show all posts

7.17.2013

My New Hobby!

First off, thank you to everyone for the awesome comments from the Glue Dots/Basic Grey/Lindy's Stamp Gang Blog Hop! It was my first video tutorial, so it was all trial and error, but I think it turned out pretty well! (click here to go back and see it!)

So it's no secret that I'm super super busy at my job, and to top it off, I have over an hour commute each way. I leave early, come home late, and find time to sleep and eat occasionally. That leaves crafting times few and far between, because family always comes first in this household! While I'm not giving up on my crafting by any means, I wanted to find something that was a little more portable, a little easier to pick up and put down as needed, but still getting my crafty fill. Hmm.

I've referenced her before, and I'm sure this won't be the last time: I get huge inspiration from Christy Tomlinson! (Her blog is here and her online store is here!) I subscribe to her monthly kit club (happy birthday to me from the amazing hubby!), and following her blog, Pinterest, and Facebook is a constant source creative fuel! She started doing 'faces' a while back, and they look AMAZING. Now, I thought...She's an artist. I'm an artist-wanna-be. I put the idea of my being able to draw faces out of my mind...until last night. I thought, what makes an artist? Talent? Skill? Sales? Careers?  Nope! Just the love of the art. And that I have.

So I'm going to draw faces.

Portable, time-friendly, and crafty. This could work. I scoured Pinterest, came up with a few good tutorials, and drew this:


Ok, admittedly a little scary. Cross between a police sketch and an alien with death-ray eyes. But for a first go, I'm pretty proud of this gal!
I didn't add hair at first because I was afraid of completely messing her up, so I took her to work, made copies, and went all beauty school on her head.

Hair Number One
Hair Number Two

Ok, so hair number one was ok, but hair number two was good! I started shading things a bit on her, too. Cheek bones, skin tone...even added a flower to her hair.

So it's a start! I'm going to keep playing. Keep creating. Maybe some day she'll even make it to a canvas :)

2.17.2013

'Well Done' Canvas

I'll admit, I've been a little canvas obsessed lately. I love the fact that you can put all of the love, detail, and depth onto a piece of work that you can then hang up and admire every day! This is the first larger (16x20) canvas that I've done. I have done everything else on 8x10's or smaller. I didn't think that a larger canvas would pose much of an issue, but I did find that I was at more of a loss at times as to what I should add next than when working on the smaller pieces. I'm sure that just comes with time and getting used to working on a bit of a larger scale.
I didn't know exactly where I was going with this piece at first, but as I kept adding, digging through my stash of materials, and daydreaming about this girl, it because very clear: I was creating me! It wasn't until her hair was drawn on that I realized that I had just put myself, as best as I could, onto canvas.
So, with mild trepidation about being a bit personal here, here it is:


I found this awesome paper doily at my local paper supply store, and I might have been just beyond giddy when I was able to run it through my typewriter without any problems (or typos!).

This song by Moriah Peters speaks volumes to my life during this past year or so. It was 100% a huge leap of faith when my husband and I uprooted our family, left our house, I changed jobs, and moved to where God was calling us. As it always is with God's hand on your life, it was the best decision we could have made, and we have been blessed beyond words.
I used the same materials that I normally use for my canvas work, including acrylic paints, rub-on's, Faber Castell pens, and Mod Podge (for more info on my normal supplies, check out this post!).
 My favorite 'happy accident' about this piece was my girl's face. I randomly pulled out a page from my dictionary, cut her face out, and adhered it down. It wasn't until I was doing my detail work that I realized exactly what page and what specific section I used: happy. How fitting.


As trends, styles, likes and dislikes come and go through the years, I know that this is a canvas that will be hanging on my wall for a long, long while. Every time I look at it, I think back, remember God's hand on my life, and smile :)

1.19.2013

A Mixed Media Weekend

The Deeply Rooted house is fully recovered from the Holidays, but now we're gearing up for a birthday party! My youngest will be turning three in a few weeks, so expect a nice, big post all about that in the coming weeks!
I recently had a great weekend up with my parents, without kids! It doesn't happen very often, but it gave us a great chance to catch up, eat, shop, and craft! I was very impressed...mom created her first canvas piece! I have a feeling she's hook on the mixed media style, because she's already sent me pictures of her new Zentangle journal, complete with a collaged cover!
I used the weekend to finish up one canvas, and then did one alongside mom, as well. The shopping trip was a great success, because I found the rub-on sentiment that I ended up using on this piece.

  I gave her a berry wreath for her hair, which I *love*. It doesn't stand out that much, but I feel like it gives her just enough interest.

I also used white rub-ons to give her flowers in her hair. I colored them with my Faber Castell big brush pens.


I'm thrilled to debut my mother's first canvas, as well! She seemed to have a great time making it, and I'm proud of how she finally 'let go' and let the piece create itself!


Not bad, eh? I love it! It's great to be able to make something you're proud of and be able to see it every day. I'd love to see your favorite creation! Leave a link in a comment so I can come check it out!

8.26.2012

Let Your Heart Soar

For a few weeks now, I've been praying for a friend that I left at my job in Ohio. My best way to express what's in my heart is to create, and it had been awhile since I had an evening that I: a) didn't have plans, and b) wasn't physically or mentally exhausted. I finally made some time this weekend and made this piece. 
I had kept a thought in my head from sometime this last week: someone's favorite color combination for the Fall was navy and orange (from a facebook update? Pinterest post? No clue!). I pulled out navy, burnt orange, and green paint, a 5x5 deep edge canvas, markers, and my tub of Mod Podge and got to work.

I Mod Podge'd (yes, that's a word in my house) some printed blue cardstock to the canvas, then randomly painted over 99% of it :) I felt all Christy-like and stamped with some bubble wrap I managed to sneak away from my kids. Next came random rub-on's, gel pen doodles, and some splashes of Adirondack inks.
Mr. Huey sprayed some tan onto my canvas letters to make their colors a bit more uniform, and I used my new favorite toys --my Big Brush Pens-- to write and color my chipboard heart.
These chipboard pieces were quite the find: packs of 20 or so random embossed chipboard shapes for $1. LOVE! I first painted the butterfly, then distressed it with ink, markers, and pens. I used some pop up Glue Dots to add some depth behind him:


And I loved how this simple little heart chipboard turned out, just by using the Big Brush and gel pens:


I just love how it turned out, and the best part?? It's SO easy to do! The less perfect, the better, which IS perfection, in my books!


7.19.2012

Breaking it Down, Mixed Media Style!


Hello again! I'll warn you from the beginning; this will be a super long post!! I'm going to try my best to explain, step by step, my creating the mixed media canvases I shared in my last post. 
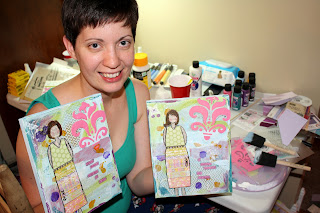
C'est moi. Forgive the bags under my eyes, this was very late/very early!

The great thing I've already learned about mixed media is that you can use so many things that are considered scrap or trash. Paper, ribbons, rub-on's...the left over bits and bobs make the best materials for these projects.  
 
Here's a list of the supplies that I gathered to get started: 
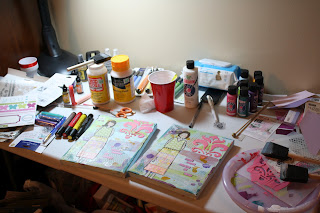
My mess of a craft table. Somehow, it works.

Mod Podge (or something of the like). You'll be gooping this stuff on, so you might as well get the big bottle! I've seen 'recipes' to make this at home, so check back for a post on that excursion later! 
Acrylic Paints. The cheap kind works great. I got mine for around 70 cents a bottle, so go all Roy G Biv in the paint aisle and stock up. 
Paper. Again, scraps work great. Unless you're looking for a specific pattern or have something already in mind, pick through your scraps for this. 
Canvas. Any size, and shape, and again, get the cheap ones. I'm sure the expensive ones are 'nicer', but you're seriously covering it in paint and glue up to your eyeballs. Go cheap and just buy more :) 
Paintbrushes. I picked up a multi-pack of the foam brushes for this go-round, but I'll be getting some bristle brushes for the next time. The foam soaks up whatever you're working with too much for my tastes. 
Modeling Paste. This can get pretty pricey at the craft store. The jars I've seen are around $20 each; I lucked out and found a bottle of it on clearance. This is a good product to whip out your 40% off coupon for. It's worth the splurge! You'll also need something to spread the paste on with, but don't buy anything special. I used an old, plastic library card. What better re-purpose for those fake credit cards that come in the mail!?! 
Stencils. This is another item that comes in a variety of price points. There are some designed specifically for crafting (The Crafter's Workshop), which I did use on this project, but I also used a stencil that I picked up at my local super center on clearance for 25 cents! 
Pen. I've yet to see the pen that Christy (haha...we're on a first name basis now somehow!) recommends and sells in her store out-and-about anywhere, so I tried my luck with a normal ball point pen. Worked great!! She does talk about how her recommended pen will still write when your canvas isn't 100% dry, but I didn't come across a problem using mine. 
Markers. OK. I'm going to admit this now and get it out of the way. After watching Christy's video a zillion-ish times, I bought every color of the Faber-Castell Artist Big Brush Pens that I could get my hands on. Granted, they were on sale at 40% off and free shipping, but they still made a dent in the {non-existent} crafting budget. Minimum, I'd suggest getting black (to outline), brown, yellow and red (for hair colors). These are amazing pens that use India Ink, which allows them to blend fabulously. Love, love, love. I also pulled out a few Faber-Castell gelatos to use for the cheeks :)
Rub-on's. Any and all will do. These are a great way to add visual texture with intricate designs with no effort at all. You can use scraps of rub-on's, designs you're not interested in putting on layouts or cards, really anything.  
Sprays/Inks. Any kind. It's just to add visual interest. 

So the list seems long, but it's really only a few items for such an amazing piece! Of course, you can add fibers, ribbons, and anything else your little heart desires.  
 

Let 's get started! 
 
The first step is to adhere your paper to the canvas with Mod Podge. Feel free to tear different sizes, shapes and patterns. You don't have to cover every inch of your canvas, but use enough to establish a good background. The trick to Mod Podge is to put a layer under AND over what you're adhering down. Under makes it stick, over makes it stay. It dries fairly quickly, but make sure it's dry before moving on. A blow drier works wonders. 
 
Step two: paint it up. I knew I wanted my background to have an overall blue-ish tone to it, even though I used greens, reds and whites in my paper. Take some acrylic paints, and give your canvas an all-over light coat. Don't worry about streaks, that adds to the texture. Some areas can be darker, some lighter. Have fun with this part! I gave the sides of my canvas a light coat (using my fingers) of the blue while I was at it. 
Feel free to grab some other colors and get those on there, too. Get your fingers messy and get creative! 
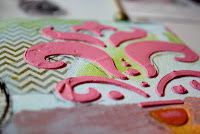
Stenciled modeling paste
Three: stencils and paste. Use them with your paints for visual interest, and use them with modeling paste for depth! Modeling paste comes white, but just use any color of your paints (or splurge on some ink to drop in for a more vivid color) mixed into it. Grab your library card (ha!), scoop some up , place your stencil, and gloop it on! The thicker you apply the paste, the more depth you'll end up with. It's always an amazing feeling to spread that stuff on, pull back your stencil, and see such an amazing, easy effect!!! 

I applied the modeling paste once I was satisfied with how the canvas was looking, because I knew this would take the longest to dry. I used the hair drier on it for a few minutes, but then ended up just working around it for the rest of the piece to let it completely dry. 
 
Fourth (but could be at any point): Sprays and inks. Add as little or as much as you'd like.  
 
Next: the girl! The design of this girl is 100% Christy. I'm not even going to pretend that I had any creative insight in this portion!! This part is my favorite because it's when you see this crazy conglomeration of colors, patterns and textures all come together to make an amazing piece of art. 
Head/neck, arms, legs: These are cut out of an old book. Mine happens to be a dictionary that I've been tearing out of for years. Don't worry about getting anything shaped perfectly, you'll be tracing around it with your markers later. 
Shirt and Skirt: cut each out of paper of differing patterns for contrast. I think this is one area that I'll need a little more practice in, because I didn't end up giving either of my ladies a very flattering figure! 
She gets Mod Podge'd down (remember, under and over!) and left to dry. 

 
Lastly, finishing touches! This is where I pulled out my pen to doodle in random areas around the canvas, applied rub-on's in various spots, and got to try out my new markers! 
I used the black to outline completely around the girl, then went in with brown, black and red for her hair. 
I cut apart a sticker with a phrase on it, added those on (they stuck very well without any other adhesive than their own), and marked around them with my pen, and was finished!! 


I don't know that I've ever been as excited about the results of a project - ever. I didn't expect the process to go as smoothly as it did or to turn out as well as it did. I woke up several times through the night (and even got out of bed to look at them again) to try and add fibers to it...lace on the skirt, ribbon around the bottom...but finally convinced myself that there would be more canvases and more projects that I could add plenty of different things to. 

And there will be :) 

7.17.2012

Spreading some birthday love -- mixed media style!

Hey, guys!
Was it me that said I'd have more free time to craft, photograph, and blog in my last post (two weeks ago!)?? Surely not. :)
I'm living vicariously through a lot of different friends right now...some on family vacations, some at the Stampin' Up! National Convention and some at CHA! Let me just say I'm jealous of each and every one of you!!
Things have been busy, but I've gotten some new inspiration and a new found crafty love to share with you!
First things first, I have to give all of my new-found-crafty-mojo love to the ever so talented Christy Tomlinson. You may have heard of her...like the lady who build the most awesome kids playhouse on some little new craft show on TLC!! The title of 'winner' was robbed from her, despite her amazing creation. I loved how you could see her artsy, crafty touches all around (inside and out, may I add) her work.
After the show, I looked up her blog and
FELL.
IN.
LOVE.

Her art is amazingly inspiring, and her YouTube videos are the best! You can find her blog here and here's a link to her YouTube channel. (this is the specific video I watched roughly 17 times to learn heads from tails in mixed media land!)

Here's my try at some Christy-inspired goodness!!

Mom picked this one...


...and this ended up being Kasey's.

I made one for my mom's birthday and one for my best crafty friend's birthday. The hardest part was deciding who got which!! (Mom ended up picking because she saw them first.)

Here are a few close up shots with some detail:

Modeling Paste

Pen doodling

I've really never loved anything I've created as much as these two pieces, and I know they'll live in great homes from now on.
I'll check back in my next post with all of my materials, beginning your own mixed media art, and a few techniques I learned along the way!